Thursday 22 November 2012

JAA Week 8: Under Construction


So this week and the next are all about constructing the dress and all the finishes that go with it.

I wont be giving a blow by blow account but I do have some in progress shots and its nice to take the time to have a think about how things are going and a forum to admit my mistakes. I am enjoying working from home as I have a good set up here with everything that I need. I did start the term by going into uni everyday right up until I had drawn out my patterns and made the toile, but space was a constant struggle and so I decided I would benefit more from my own space. This has limited the amount of tutor contact I am receiving but I have/ will be meeting up with my tutors once a week to discuss the way things are progressing.

A Long Hard Think About Work Ethics

The end of the project is in sight now and I am starting to feel the pressure mounting, this is mostly due to all the other demands on my time; I am teaching/assisting twice a week in a secondary school as I am thinking about undertaking a teaching qualification next year to teach secondary D&T textiles, and I am also working as a seamstress in the bridal shop one morning a week. I also have Roisin's birthday this week and I am making the cake for the wedding next week.

Whilst a lot of this was scheduled into my workplan at the beginning of the project, the teaching is a new addition(which I have not added to the plan!) so I am finding it harder to keep on top of everything. My solution is to ask Rebecca for an extra few days and hand in on the Friday afternoon instead of Monday morning of the 3rd, although I will still have my presentation on the Monday.

Also, I have had to cancel Roisin's party and the visit this weekend by my friend and her children because I have had to be realistic about what I can achieve with my time, I don't feel too bad, in fact I feel quite liberated, in previous units I have just let the pressure pile on and on without being able to say "no". Roisin was okay, I bribed her with money instead of a party, so she was happy and I was slightly relieved, what a shame I did not have this epiphany before I offered to take on the responsibility of making a wedding cake the week before hand in.

I find with my work I am always thinking through what I have left to do and how I am going to get whats needs to be done out of the way in time. I know I have enough time to finish the dress and to finish it well. It has been a huge challenge to undertake the JAA in this unit, but I have always known that it is not beyond my limitations and when I work, especially when it is something I enjoy I give it 110% effort.

Its worth pointing out that I am not rushing the construction-even though I have a lot to do. I have not invested all this time and money just to produce something sub-standard because I wanted to cram it into a unit to suit myself. On the contrary, I felt I was able to tackle this project now and that it would move me on even further for the next unit. I have already agreed with my tutors that I will complete the 18 hand sewn buttons and button holes after hand in (but before entry to the competition in the Summer) as there just is not time to complete them in this unit. I will be producing some samples however.

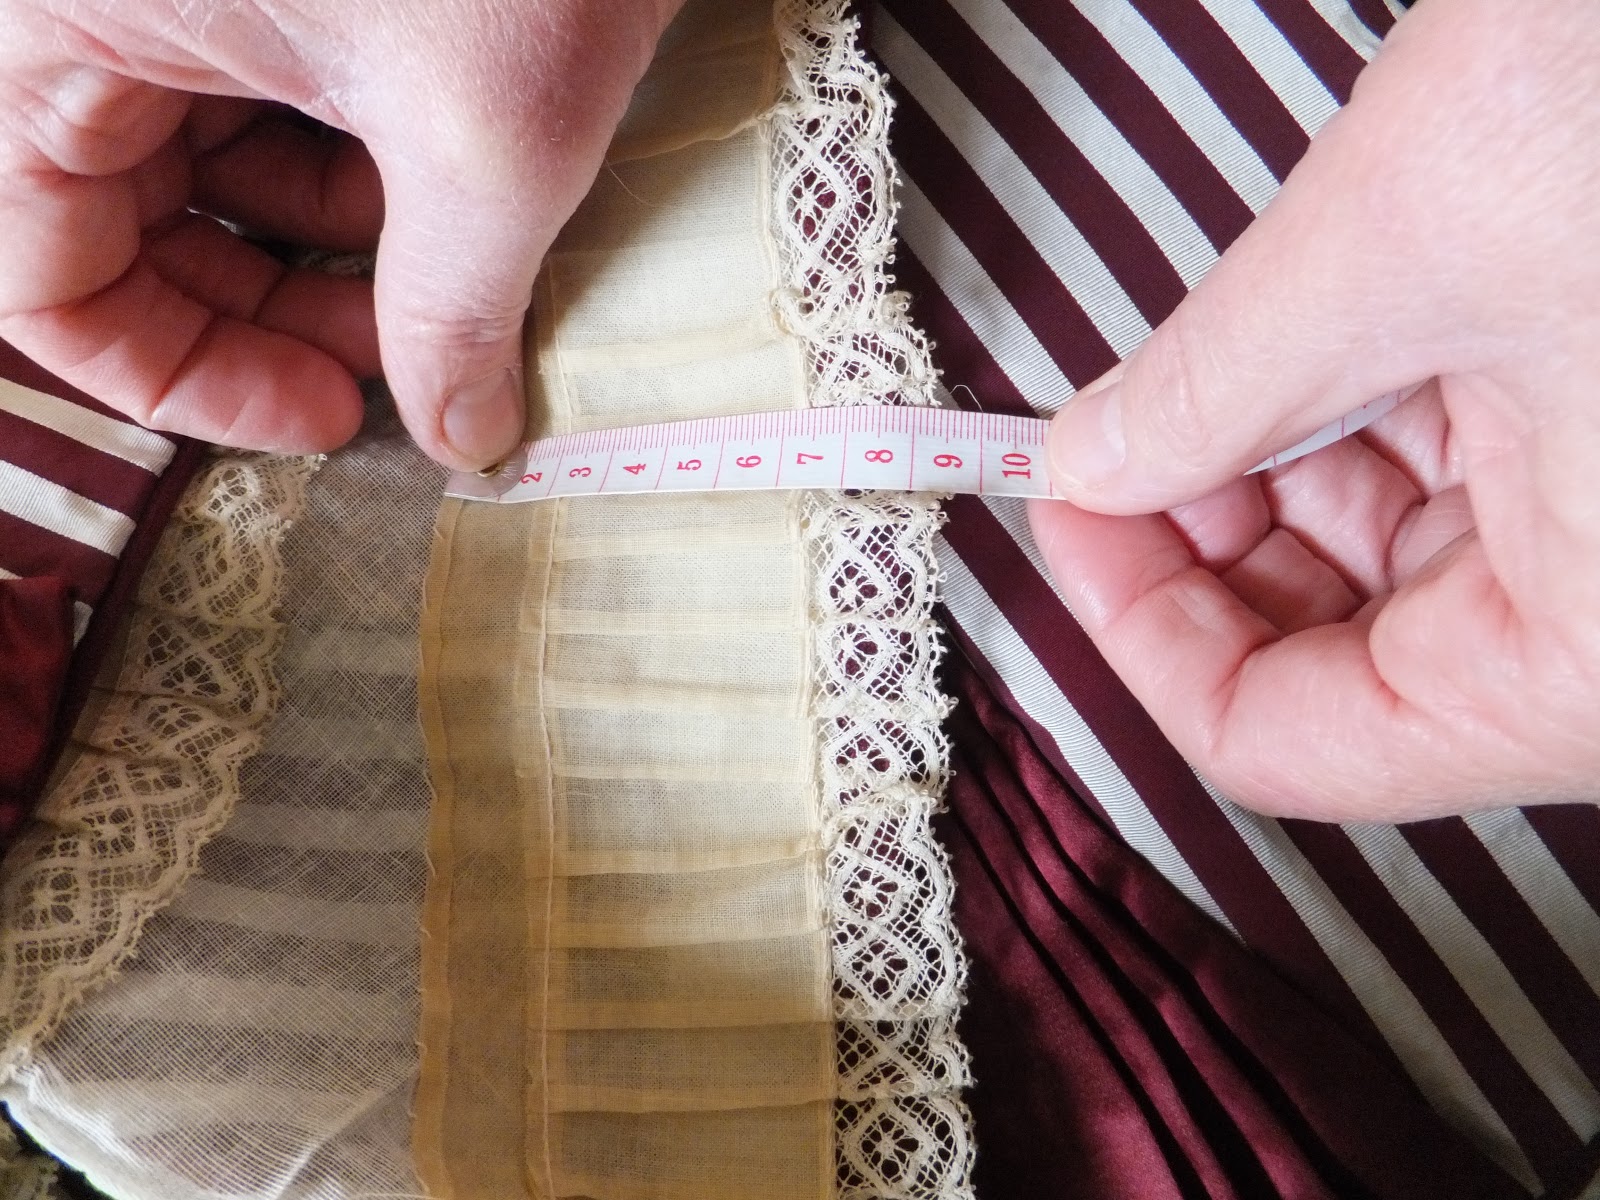
A point in case, is the organdie and lace pleated frill/dust catcher at the bottom of the dress. I had completed it earlier this week- I had tea died the organdie, which was white to begin with, and cut and hand pressed all the pleats. It took a whole evenings worth of work to complete. At some point, I realised it was not right as I went back to look at my photos of the original and I could see the proportion of the pleats to the band was wrong (pleats were too short) and the tea dye had turned the organdie a funny colour with a slight purple hue, instead of the cream I was looking for.

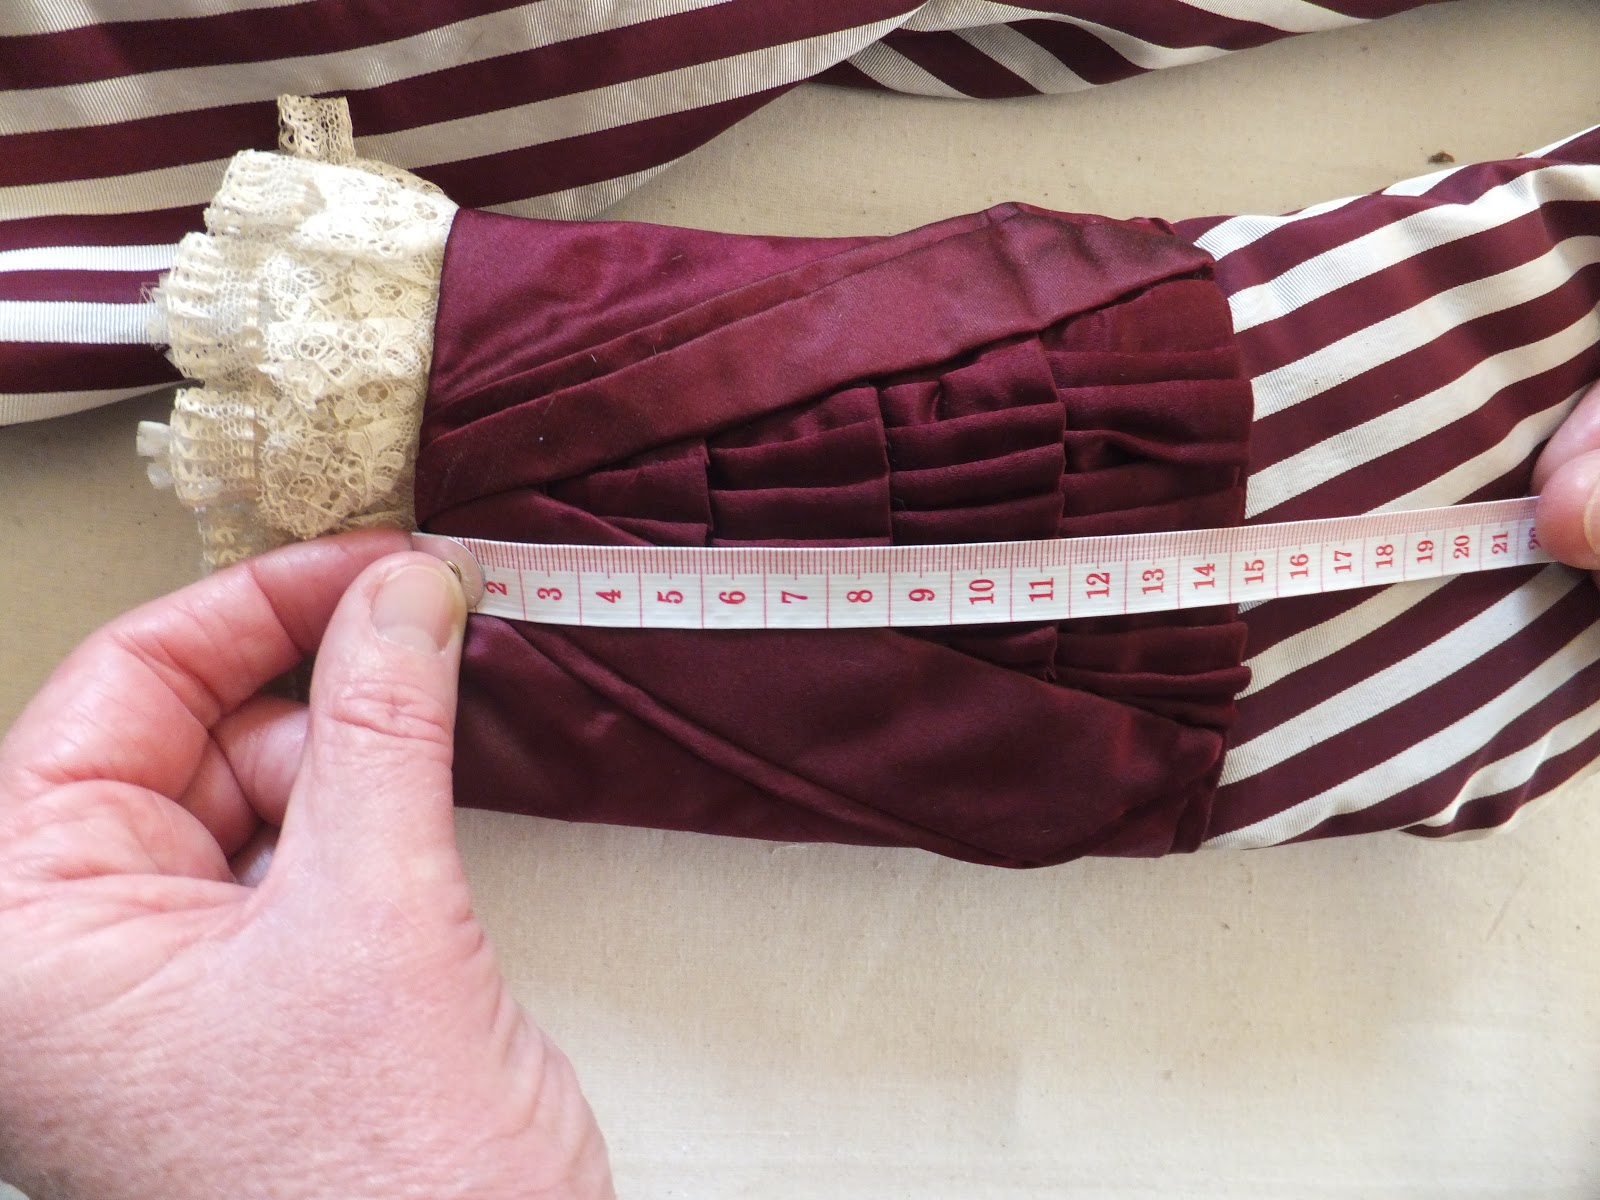
Regardless of the time I spent making it, I knew I was going to re-do it. No rush jobs. So I re-made the piece and dyed it with coffee, cut new organdie and got it right, and now it looks superb.


1st attempt:

2nd attempt:
 
 
Original:


I think there is a moral to the story in here somewhere, not least that I have realised the importance of prioritising my time and trying to balance out work/life, and that it is okay to be a little selfish sometimes with regard to my time.

I'm a hard worker, I will go the extra mile to get something right, or work very long hours to produce results and I think this is reflected in the quality of my work. I love my work, and I really am enjoying making something of my own choosing with my own challenges and I am finding that I am very capable of working independently, away from uni, which is exactly where I should be at this point in my degree.


Under Construction
 
 
As promised, here are some photos of some of the construction work to the dress, every process takes a lot of time and patience and I am constantly referring back to my research and photos I took of the original dress.


Sunday 18 November 2012

JAA Week 7: The Lace Dilema

Considerations

I may have said it before but one of the more challenging aspects of this project has been sourcing and acquiring adequate materials. By spending so much money on the fabric I am very conscious that I cannot let any of the other trimmings/materials fall below standard.

The dress has a band of pleated organdie and lace all the way around the hem and detachable(for laundry purposes) frill/lace attachments at the cuffs and collars.
Since the start of the project I have been scouring ebay and local antique shops, including a trip to Sailsbury, for appropriate lace. So far this has not been very successful, partly because the lace at the hem requires a very long intact length of antique lace and partly because I want to try and obtain something that resembles the original as closely as possible.

Today I traveled to Honiton in Devon, to visit an antique textile and costume fair, to see if I could finally settle the dilema of the lace. I'm mindful that with my deadline drawing closer, its time to make a decision so i'm excited to see what I return with.

The Hemline
 
 
Lets have a look at some of the picture I took of the original dress when I went back to Berrington in Herefordshire.


 This lace (bobbin lace I believe) is about 1 inch wide. This is going to be difficult to source in an original antique form as the lace follows the pleats, making it, at a rough guess between 6-8 metres long. I have already ordered some *antique* lace from ebay in a long length but when it arrived it was in fact new and also looked more like insertion lace (where the lace is straight at the top and bottom- and what I need is a scallop on one edge to mimic the original). I also looked at the lace I had sourced from uni and used in the petticoat, but this has the same issues.

I did at one desperate point consider making my own lace for the hem of the dress, but when I looked into how bobbin lace is made and searched amazon and ebay for books and equiptment before realising this was a crazy idea, seconded by one of my tutors, to whom I am thankful for, for the occasional tug back down to earth.

So moving on I went to the textile fayre in hope of finding what I needed for the hem. Alas, I did not find my 8 metres, but I did come back with four metres in something I think would work. However, this is a compromise, as it means sewing the lace to the pleats after they are pleated and I think this will effect the finish of this part of the garment as it will restrict the movement of the pleats on the floor.

 
 The antique laces are the bottom two in the above picture, in the end I chose the bottom antique lace with the scallop.

 
Collar and Cuffs
 
 The collar and cuffs require different lace to the hem, but have proved to be just as tricky. Again, lets look at some photos of the original:


The collar and cuffs each have a band of three layers, the first and second have a 1.5 inch very finely pleated silk gauze with one layer edged in a small net/bobbin lace edging, finished with and inch wide point de gauze lace with a flower motif.
 
* Just on a side note, I have learnt to recognise and name a lot of the different types of laces just by looking at hundreds of examples on ebay in the hope of finding something suitable.
 
I will look at how I approached the pleated silk gauze in a further post, but the laces I searched for on ebay and in antique shops in Sailsbury and Blanford Forum, but I could not really find what I was looking for.
 
My break came when I ordered some antique bobbin lace from ebay, along with an original lace and ostrich feather cap from the 1870's. The delicate bobbin lace was deffinitely antique and narrow enough in width to edge the gauze without overpowering the wider lace on the collar/cuffs.
To further cement my opinion on wheter this lace would be appropriate, it almost matched exactly to the original lace cap so really looks spot on for the period.
 
* As a further aside, I plan to use the lace cap when photoshooting this dress for my portfolio. The colours do not match exactly( infact they would have matched the original dress at Berrington far better) but I know once photographed I can adjust the colours of the cap in photoshop to match my dress, so its winning all round.
 
 
However, the final measure of lace was still eluding me, so I was also searching for the right piece when I went to Honiton.
I did find lace on the trip, it's not point du gauze lace but the lady did date it to the 1890's , which is not bad considering. It has the wonderful delicate quality of antique lace and works very well with the narrow bobbin lace and I am confident that it the laces together will bring that special look of an original material that I just would not have achieved If I had gone with a new bought lace.
 
 
So altogheter I am happy with the choices I have made, there has been a lot of searching to find the right thing, but I know it has been the right decision and ultimately it will make a big difference to the quality and outcome of my final piece of work. I also took the oppertunity to stock up on some pieces of antique lace for future projects.


Sunday 11 November 2012

JAA Week 6: Top Fabrics

Mmmmm Fabric


Fabric for this project was and is always going to be something of a challenge. The problem with trying to replicate a historical garment I have found is that our modern fabrics are different( width/fibre content/quality etc.). Man made fabrics are of course a 20th century invention and account for a lot of what is out there. My dress, is au natural, with beautiful silk and silk satins, so what I buy and use will be as close to the original as possible.

Looking closely at the two main fabrics, there is a wine/maroon, medium/heavy weight satin(possibly duchesse) and the stripe is a matching shade of wine satin and the off white/ cream stripe is actually grosgrain(!) which I would imagine is going to be near impossible to match.


The Search Begins in Earnest


My first stop was London. I spent a day between Shepherds Bush and Soho, trying to get a feel for what was available.
 
Shepherds Bush did have some wine silk satin's but I know that I need to find the stripe first, and then match the plain satin to the stripe, as the stripe is going to be harder to source. I did bring a few small samples out of Shepherds Bush, but the quality-although 100% silk, apparently, didn't feel right.
 
 
On a side note, I always knew that the fabrics for replicating this dress would be expensive. The competition does state you can make in calico if cost is an issue, or you can find similar(but less expensive fabric). I have decided though that this will be a large and important edition to my portfolio and therefore I am willing to spend out what needs to be spent on fabric.
 
 
Soho proved to be a disappointment. Some of the most amazing silks I have seen, but none for my project, stripes it seems, are just not in.
The only sample I came away with was an all white silk with too large stripes, in the complete wrong texture. Not nearly enough finesse; if this was a stage costume, you could probably hand paint in the wine colour and it would look very effective to the audience, but re-creating the period garment the choice has to be right, or you might as well not bother as it will be clear from a mile away that it looks out of place.
 
Onwards Towards the Internet
 
 
My next step was to have a look online at Whaleys/ James Hare etc. I broadened my search to include home furnishing fabrics as well as fashion fabrics. I got very excited when James Hare provided me with a glimmer of hope, and I ordered several samples. They did appear to be the only place at this point in time that I could find with any stripes that were at all close to what I needed.


The above samples were what arrived. The top two samples are called Pavilion stripe. It is a relatively cheap (£20ppm minus VAT) thin dupion stripe, which I know has been used as the default period stripe fabric for at least two previous JAA makes from AUCB, and I don't like it much (thankfully neither did my tutors). The proportions are wrong, the texture is wrong, the weight, the colour- its all wrong. Next!
The last sample, shown just above, sparked my interest a lot more. The colour is called Chili, and is quite orange, but I could overlook that. The silk/cotton mix satin was of a much better weight and quality and actually resembled the original. The stripes, although the wrong proportion(a mix of silk and linen) were striking, and the texture was more in the ball park of the original, with the grainy stripe and the satin stripe. I was quite hopeful, and I kept looking at it and holding it up and imagining it in a full dress.
 
A Rather Important Reflection
 
 More often than not, as I keep learning and working and getting towards the end of my degree I have moments when I will suddenly see where I make my mistakes, which always means progress as a practitioner. The last fabric sample was a prime 'lightbulb' moment. I got carried away. Having found a fabric, that 'kind of' worked, I somehow convinced myself that it would work. I got overexcited and forgot about one of my earlier costume making epiphany's where I learnt that it was vital to take a step back and be really honest.
 
Honestly, this fabric was not right. As I said earlier in this post, it "has to be right or you might as well not bother". This fabric has the wrong proportion of stripes, and as long as that is wrong the whole dress will look out of proportion to the original, the fabric was too modern, and looked the furnishing fabric that it was.
 
So another lesson learnt. With period costume, the right fabric is essential, this is my mantra.
 
 
Back to the Drawing Board
 
 
Now was the time to go digging through the fabric archives available at uni. Up until now it hadn't really been accessible due to all the building works and its new home. I spent many hours looking through all the sample books from many various fabric companies, and I had to keep going back. At some point I came across the Bennett's catalogue where I found a stripe in all white that looked about right in proportion. In the same book further along, I found the same fabric in several different colourways- one of which was a gold/claret. Alongside them in the samples are matching duchesse satins.


The most important thing about this stripe( 100% silk damask) was the proportion of the stripes was almost identical to the original. Having remembered my previous lesson however, I did not get overexcited as, neither the all white or the gold/claret was right. The white was missing the bold striking contrast of the original white/wine combo and the gold/claret looks all gold in some lights(owing to the gold weft running through and across the claret weave). It also took a long time to find a matching shade of satin to the gold/claret.

When the large samples were delivered(the ones pictured) it really helped and finally I conceded that I had found a pretty good match in the gold/claret and matching duchesse satin (£54pm, £43pm respectively).

If I had more time, then maybe I could find something even better. But there also has to be a balance between what is right and how much time you have. I brought the samples to the original dress and laid them out on top to really get an idea. The gold/claret does indeed match perfectly in terms of proportion of the stripes, they are both beautiful quality fabrics that will add to the look of the final piece and as I have to start cutting in top fabric very soon if I am to stay on schedule I am out of time as well. But happy with my choice and very excited to get on with the dress in top fabric.


Below are the photos that I took of my fabric samples against the original garment. You can see that the damask silk, white and gold/claret is in perfect proportion and I think this has been a very important element in terms of the dress coming together. If I had settled on an earlier fabric with the wrong proportions, the dress would not resemble the original in such a way, I can only use my imagination but I think the end result with a different fabric would look very different and not nearly as successful.


There is More to Come
 
 
Needless to say, its not just the main top fabric I need to consider. Lining, lace, facings/interlining thread all need just as careful consideration and I will be looking more closely into these in a subsequent post.

Monday 5 November 2012

JAA Week 5: Return To Berrington

 
A Closer Inspection
Okay, so the toile is done and I have a hundred questions about how the dress is finished, i.e, how is the collar attached? How are the cuffs constructed? and what do the lace frills look like close up? These and many more needed to be answered on my trip.
I'm very glad I chose to get the toile ready in preparation as I have been able to get a realistic expectation of the proportion of the dress and how it fits together which means I can concentrate on the finer details of the original garment.
On seeing the dress again I was not disappointed. It is a long journey to Berrington, now for the second time, but this first hand research is absolutely imperative to the direct outcome of how successful my reproduction will be.
Along with Althea, the collection curator, I was able to spread the dress out, take photos and touch it, going over all the construction details with a fine tooth comb to reveal their secrets. I thought I would write and sketch during my time, but this in fact did not happen. I have always been blessed with a very vibrant photographic memory, so instead I focused on getting a real grasp of the garment from a sensory perspective; the textures the colours and so on. I discussed with Althea how different areas where constructed and we both learnt many new things, including how the hem was finished and how the cuffs are attached and I really got a good picture in my head of how I was going to proceed with my own version. All the time I took lots of photos of all the little details to have a solid record that I could refer back to, for me, the detail photos are a much better source of accurate information than anything I could draw or describe.
Althea seemed suitably impressed with my toile which made me feel confident and ready to get on with the real deal. The trip also helped me make that final decision on top fabrics as I need to purchase my material for the start of the next week of the project.
I really cannot stress enough about how much this visit has helped me. There is no way I could produce a faithful reproduction without the information gathered from looking carefully over the original which will in turn give me the information to make better decisions about my own work based on relevant research. Of course, I will not be able to copy all the fabrics and materials/ lace etc. exactly, but I will be able to explore my choices more efficiently, use my own independent judgement, hopefully with a very successful outcome.
Here are the photos I took on the second vist- there are quite a few of them, but as I am not printing them all off in my workbook I am putting them up here.