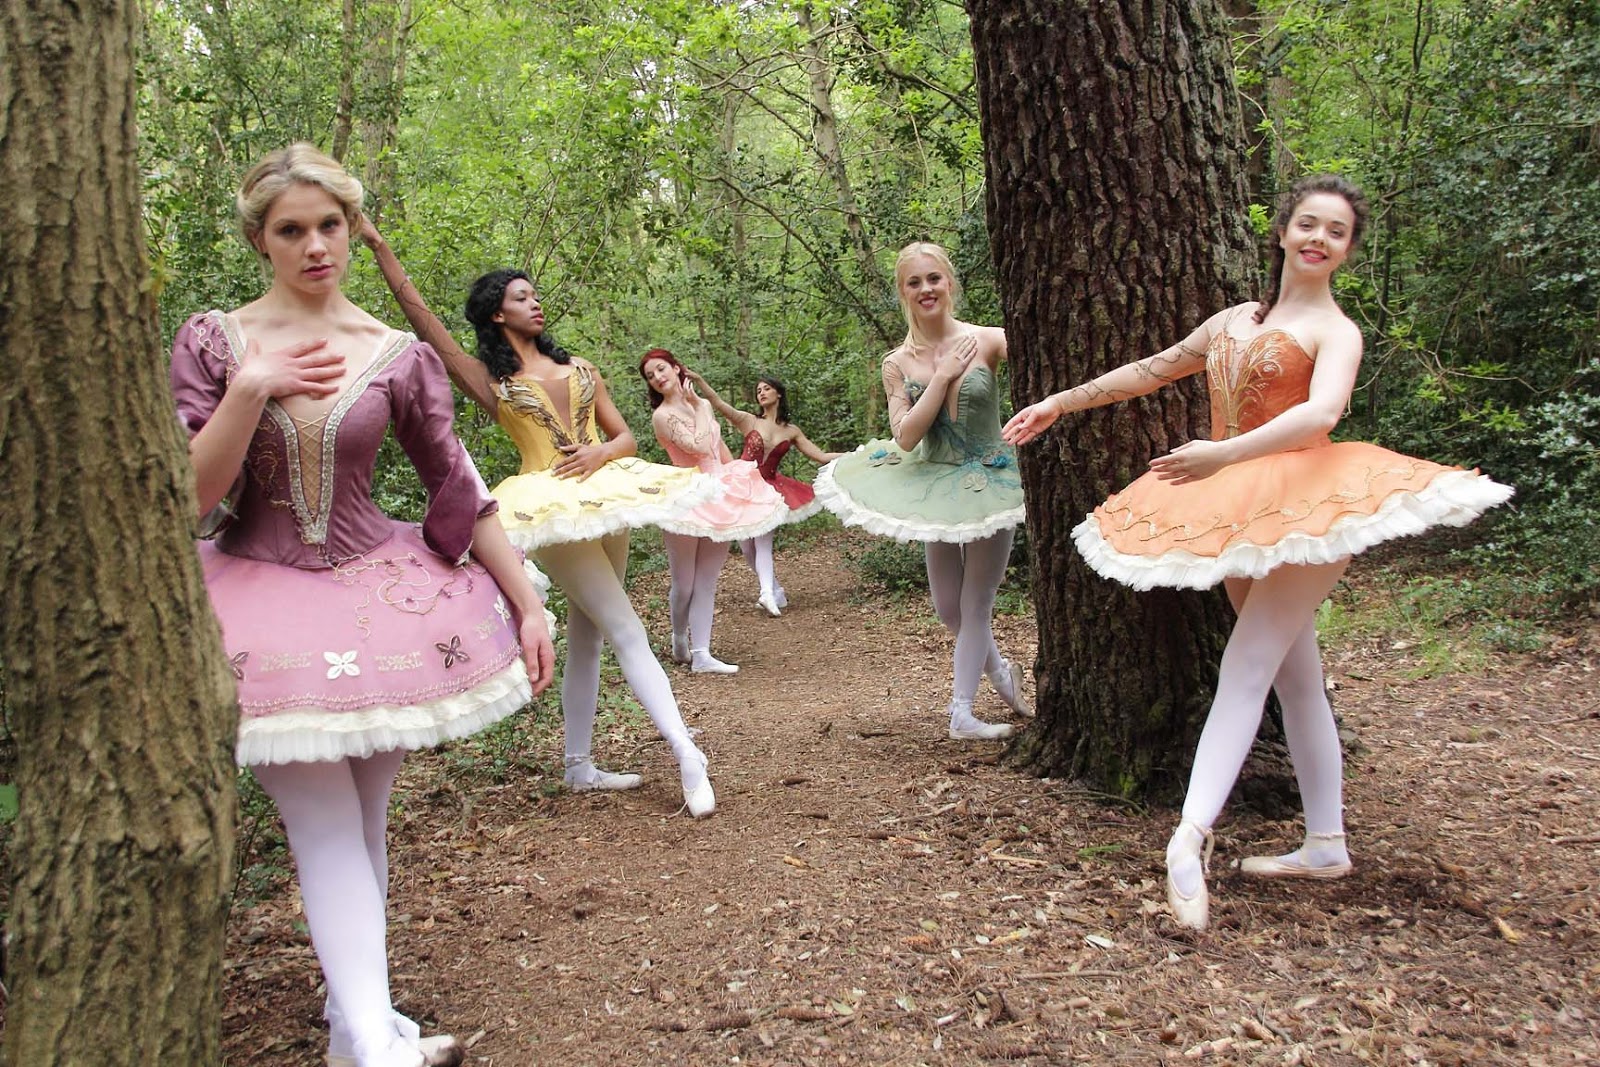
Friday 7 June 2013

Ballet Tutu Photoshoot- Lilac Fairy and Friends

So here are some of the finished photos, by Ying Yu Chen and my model Becky Pepper. The other tutu's made by my colleagues at the Arts University Bournemouth with models from Arts Ed, London.


Thursday 6 June 2013

Black Swan-Odile Tutu

Well, my degree is finally over and graduation is just around the corner. I'm feeling very empowered (having had a few weeks sewing free) and ready to take everything I have learned and start on my journey as a costumier.

It was always my intention to create another classical tutu straight off the back of the Lilac fairy as I want to make sure I have a good grip the processes of making the tutu base, on top of the fact that I just love creating these costumes.

The question was always, 'what do I choose?' Sugar Plum Fairy, Princess Florine, Firebird, White Cat, Odette, Odile, the list goes on and on......
I knew I wanted to do a classic ands that I wanted to work in a different colour net, as Swan Lake was the first ballet I saw it had to come down to Odette or Odile and during a rather restless night in the middle of my last few weeks of uni work, I came up with such a strong concept for Odile that I had to just go with it.


Now I'm not much of a drawer, so please excuse my rough sketches, but my idea for black swan was to have a slick, wet, oiled swan, like a bird trapped in an oil spill with the oil hitting the water and creating the rainbow of colours. Here are the sketches and some inspiration photos:


I have already mapped and patterned the body and cut it out ready to be tacked in top fabric. By sheer chance I had a metre of black grosgrain moire in my stash, which could not be closer to the look/texture of an oil spill if it tried. Result. Shown also are the beautiful aray of Swarovski crystals, beads, pearls and feathers that will also be making an appearance on the tutu.


Hopefully, I plan to get this costume constructed over the next seven weeks, I will keep you all updated with the progress.


Tuesday 21 May 2013

EMP: Ballet Photoshoot


I have not written as much in my blog as I had hoped to, although most of my time has gone into the practical application of making the costume and writing up full instructions and a workbook, but I have particularly enjoyed working with the students at the Arts Education School in London. They are mainly a musical theatre school but they learn dance, including ballet and so we have had live dancers to fit our costumes to.

The fittings have been covered in my instructions, but it is still interesting to reflect on the opportunity and is positives and challenges.
I unfortunately ended up with a different artist for each fitting, and then another artist for the final photo hoot. Naturally, I was worried that my costume would not fit, but luckily there were no major problems on the day- I could have achieved a better fit, had I received the same artist on each occasion, but the nature of costuming is very fluid, so it is an asset to be able to think on your feet in such occasions! However, my final artist was lovely and very accommodating having travelled at short notice all the way from London to Bournemouth. So it was important that I put her at ease as quickly as possible by being approachable, friendly and judging whether she wanted to have a natter as I dressed her into the costume. She was obviously aware that the costume had not been made for her specifically so I made sure I gave her confidence in how she looked in the costume (although she looked great in it anyway).

The shoot was fun and colourful, but long and tiring, especially for the artists who had to stand around for long periods of time. Provisions were made to feed and water them during their visit and I did as much running around for my artist as I could to make sure she was comfortable and that she had a good experience. When her time came for the individual shots, from experience I knew I needed to make sure I gave her a lot of direction so that I got all the shots that I want for my own portfolio.

As a group the costumes looked amazing and their was a real sense of achievement from the whole of the group, even though working in such a tight knit unit held its own challenges, the outcome was very positive and I think we could all stand back and appreciate each others hard work and input into such a successful project.

I am still waiting for the professional photos to be delivered but here are a few shots I took on the day.


Monday 1 April 2013

Wood Nymph: Finished


This tutu is finally complete and has been for its photo shoot and I am very pleased with the outcome....enjoy!


Friday 22 March 2013

EMP Thoughts on Tutu Construction


In my last post I touched on my thoughts around what it was like to finally learn the process of tutu making, I thought it would be a good idea to elaborate on that and the relevance  it has to my studies.


Problems:
I never expected I would have specialised in ballet during the course of my degree, but the allure of learning to make a tutu was huge, hence, here I am. I have discovered over the three years that I am certainly a perfectionist and I thoroughly enjoy careful, neat and decorative work. I knew a tutu was difficult in its construction, but I am really enjoying the methodical processes; I am already planning my next tutu. That's not to say I have not struggled with the making process, I have had an absolute nightmare with a 'floppy' tutu, compared to the other girls, my tutu seemed to look more bell shaped than plate shaped and this has continued to irk me throughout the whole project. Nevertheless I like to look upon these things as a learning process! Here's a few thing s that I have learnt out of this problem.

  • Firstly, these ARE robust items indeed, at first I was worried about touching it in case if fell apart, but because of the drooping I had to re-string it and handle it far more than I would have done if it had been more pancake shaped. This meant that I had a lot of confidence in how well I had built the tutu, after all, in reality they would need to survive, hours and hours of dancing.


  • The length of steel in the hoop does make a big difference: Our tutor did say that hooping the tutu was the hardest part to get right. I did not put enough steel into it in the first place- I thought if I removed the steel and added a longer piece then this would rectify the floppy issue. It did not, it just made a really awful shape...

  • You can never have enough strings: Lots of strings help to control the net just how you want it. I tried putting strings in everywhere to help combat my droopy tutu. They helped a bit.


  • Net quality is a huge factor: We were advised at the start to try and get the best quality net possible, specific to tutu making, the net was better than some, but it is my final conclusion that it was the net that was the major cause of my problem-

  • ...unless.....being a neat stitcher my pleats were very uniform which helped to create a beautifully smooth tutu. This did however make it very flat, with a distinct lack of body (a bit like straightened hair), I wonder if this also added to my little problem.

  • Other thoughts considered were the size of the layers as I cut a medium sized tutu and also where the channel was sewn in for the hoop- next time I would try and sew it further out to give the net layers more support.


Thoughts:

Ideally I'm hoping that this niche skills will make me a valuable asset to someone, but I have enjoyed making them for the sake of art and beauty, something that I looked at in depth during my dissertation- the tutu is symbolic, as Balanchine famously said "Ballet is women" and ballet is synonymous with the layers of pleated net that show off the long lines of leg and foot work so prized in the art form. As I really enjoy this genre of performance, being able to have the skills needed to build an fit these specialist pieces of costumes is important to me and I hope to pursue this skill throughout my career.

Monday 18 February 2013

EMP- Fabrics and Flowers

Fabrics


So after a lot of debate and a tough, wet trek around the London fabric zones, we have decided on a cohesive colour palette- we are going with the slubby hand woven silk dupion in the rich, deep colours, so reflective of the pre-raphelite shades. Admittedly, I still do not like the thought of using dupion as it is used lazily in costume making as a cheap silk. However, in the interest of the group we have decided to go with it as we can all find a suitable colour for our costume from the same range of fabrics which was proving to be very difficult. The challenge is deciding a shade and finding a silk organza to match the dupion, but thankfully I have I have succeeded by doubling up two layers of silk organza (red and purple) and getting a near perfect match. The gold layer under the coloured organza with just be a gold/silk organza and I have decided to introduce silk velvets into my costume to reinforce the royal overtones of Lilac fairies costume this may be the sleeves and around the neckline.


Our next task was to start the construction of the actual tutu, something I have eagerly been anticipating! Since learning how to make a romantic tutu in SDP last Summer I have really been looking forward to learning this most niche of processes and demystifying the construction. You do not 'make' a tutu- you 'build' it.

I am of course writing up a full set of instructions on how to do it, but not to be published on my blog ( no-one really admits it, but you don't give up the trade secrets, it's a bit like the magic circle!)


It is a time consuming process and requires accuracy and patience, but so far, so good, quite enjoyable, the key I am finding is to keep refining the process, so you find your own specific way of achieving each step in the most productive way that suits your own style.

 
Flowers
 
 
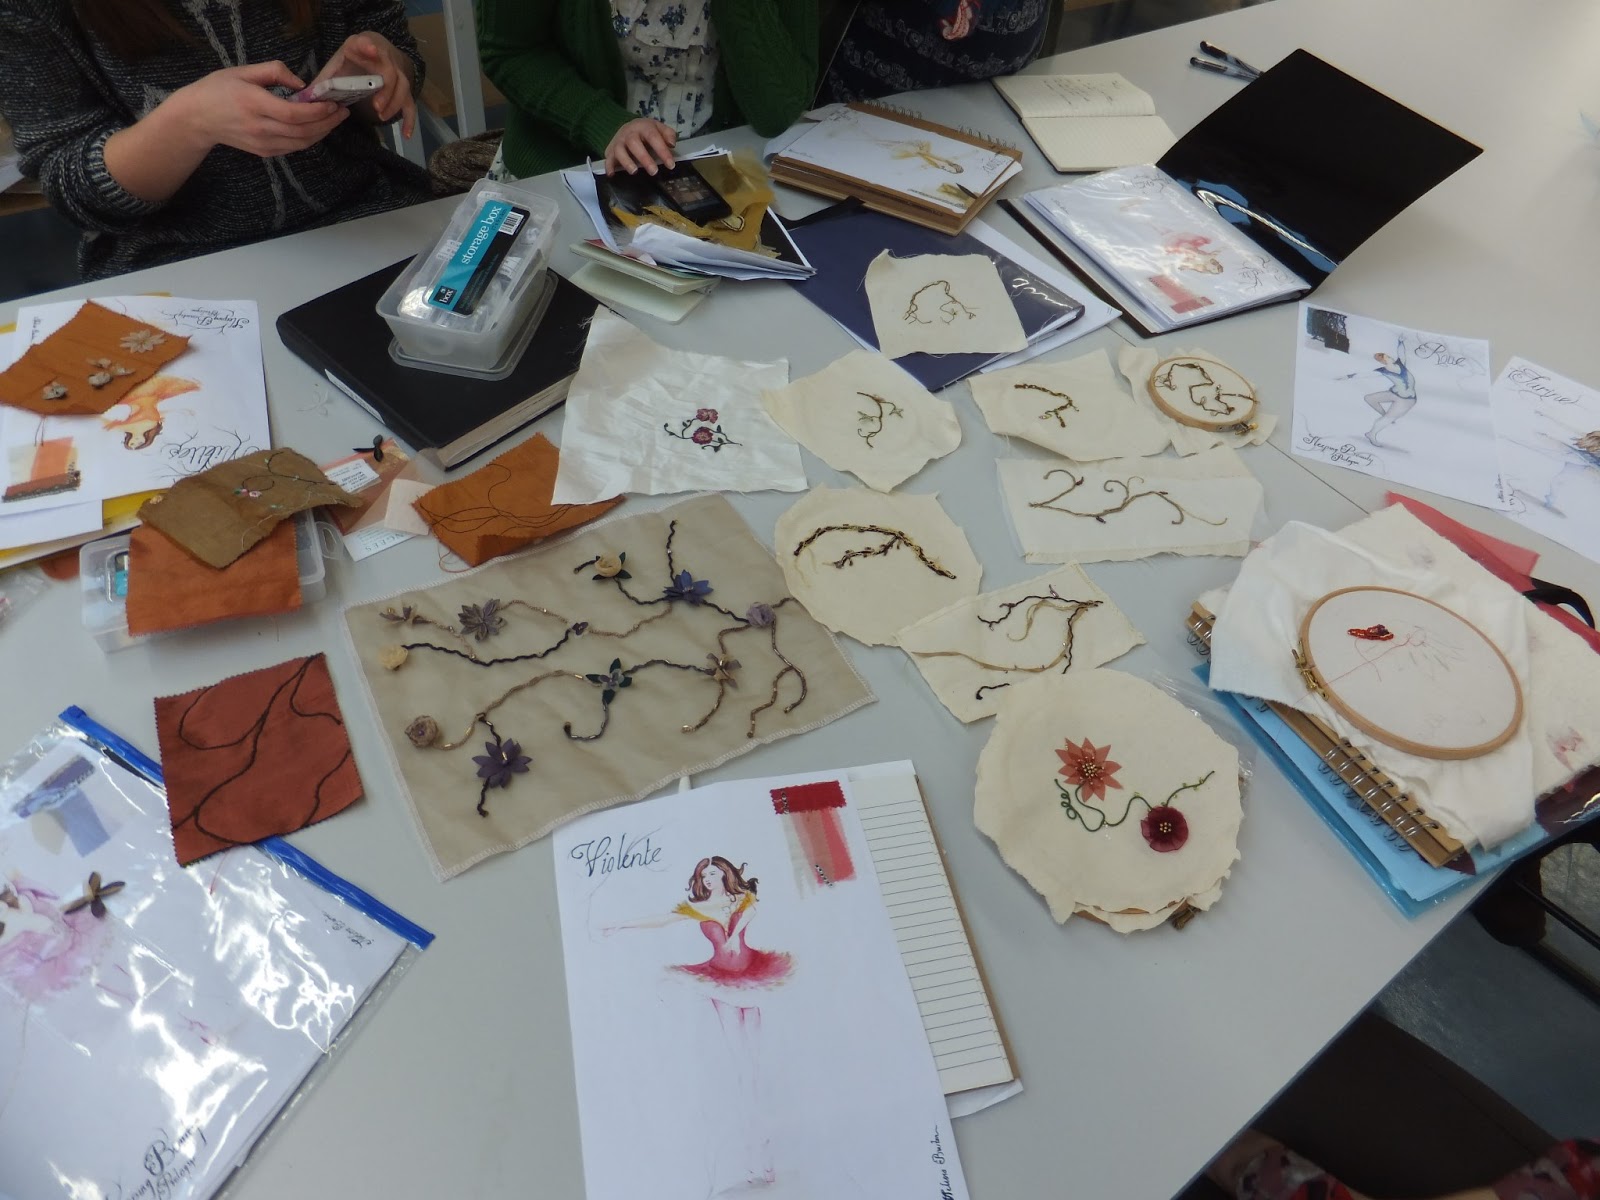
We are already starting on the decoration samples- each costume will include the briar rose but the briar has to be made the same way using the same components on each costume. In the first we are all just coming up with our own samples. I have decided to laser cut some flowers and hand craft and paint some other flowers. I already wanted to try out something I saw at the ROH for the bramble: It involved unwinding would cord as it leaves a lovely kinky braid and then adding in some beads/ crystals for interest.


As you can see they all turned out very different, some of them were very delicate and worked very nicely, although I was quite pleased with mine I could see from the other samples that it was too large in proportion- remembering that the decoration is for a photo shoot and not for the theatre...mine was suited more towards the theatre in style.
 
We decided to pull all the best elements from each sample and then devise a short list of materials before each going away to make a second sample, using only those components and applications. The idea behind this was to refine the sample in the direction we wanted to go but without limiting our own talent to push the sample forward.
 
The whole process was quite difficult as we were expected to critique each others work and eliminate things that did not work, this is actually harder than it sounds in a group of your peers and I stepped forward to diplomatically suggest ways of working out what to do.