Undergarments Galore
Another full on week making the undergarments and under structures to create the right silhouette for the dress.
I have been using original patterns from The Complete Guide to ladies Pattern Cutting, 1883 and Harper's Bazaar 1878 which have been assembled and edited in the Frances Grimble book "Fashions of the Gilded age, Volume 1".
This book and its subsequent volume deal solely with the natural form era c. 1876-1883, the period my dress is from. This small era in fashion history concerns itself with the cuirasse bodice and the Victorian *polonaise* (a Victorian take on the dresses of the 18th c by the same name) where the panels flow in one piece, close to the body from nape to ground. The swag from the first bustle period is still evident, and although bustles are still worn with the fabric gathered to the back from the front the female form is revealed from neck to hips- something which had not been seen since the beginning of the century. The corsets of this date are mid bust and very long, down to the hips, with small wasp waists creating the perfect foundation for the bodice. The spoon busk has also been invented in this decade and encouraged a slightly rounded belly shape.
For my unit I am making three undergarments from the period, adding to the two pieces that I had previously made. These items will hopefully work cohesively together to create just the right shape to support the dress- but ultimately I won't know until I get the toile up and on top of them over the next two weeks- it will be at this stage where I will consider the success of the garments I have chosen, and if they are not right, I will consider other alternatives from the period.
I already had made a set of drawers from the period and a small muslin hoop skirt, dated the same year as the dress (1878). Unlike the large crinolines of the 60's this skirt has a straight front with no steels and the steels in the side and back are small with the emphasis at the CB, serving the purpose of keeping the skirts away from the ankles and helping them to fall in a straight style. Initially it looks quite square from the front, but you can see from the photos how adding the petticoat helps even the shape out; once the full weight of the dress is on top I think it will look just right, but this is one area where I'm not completely sure and I will have a better idea after the toile stage.
So on to the Makes
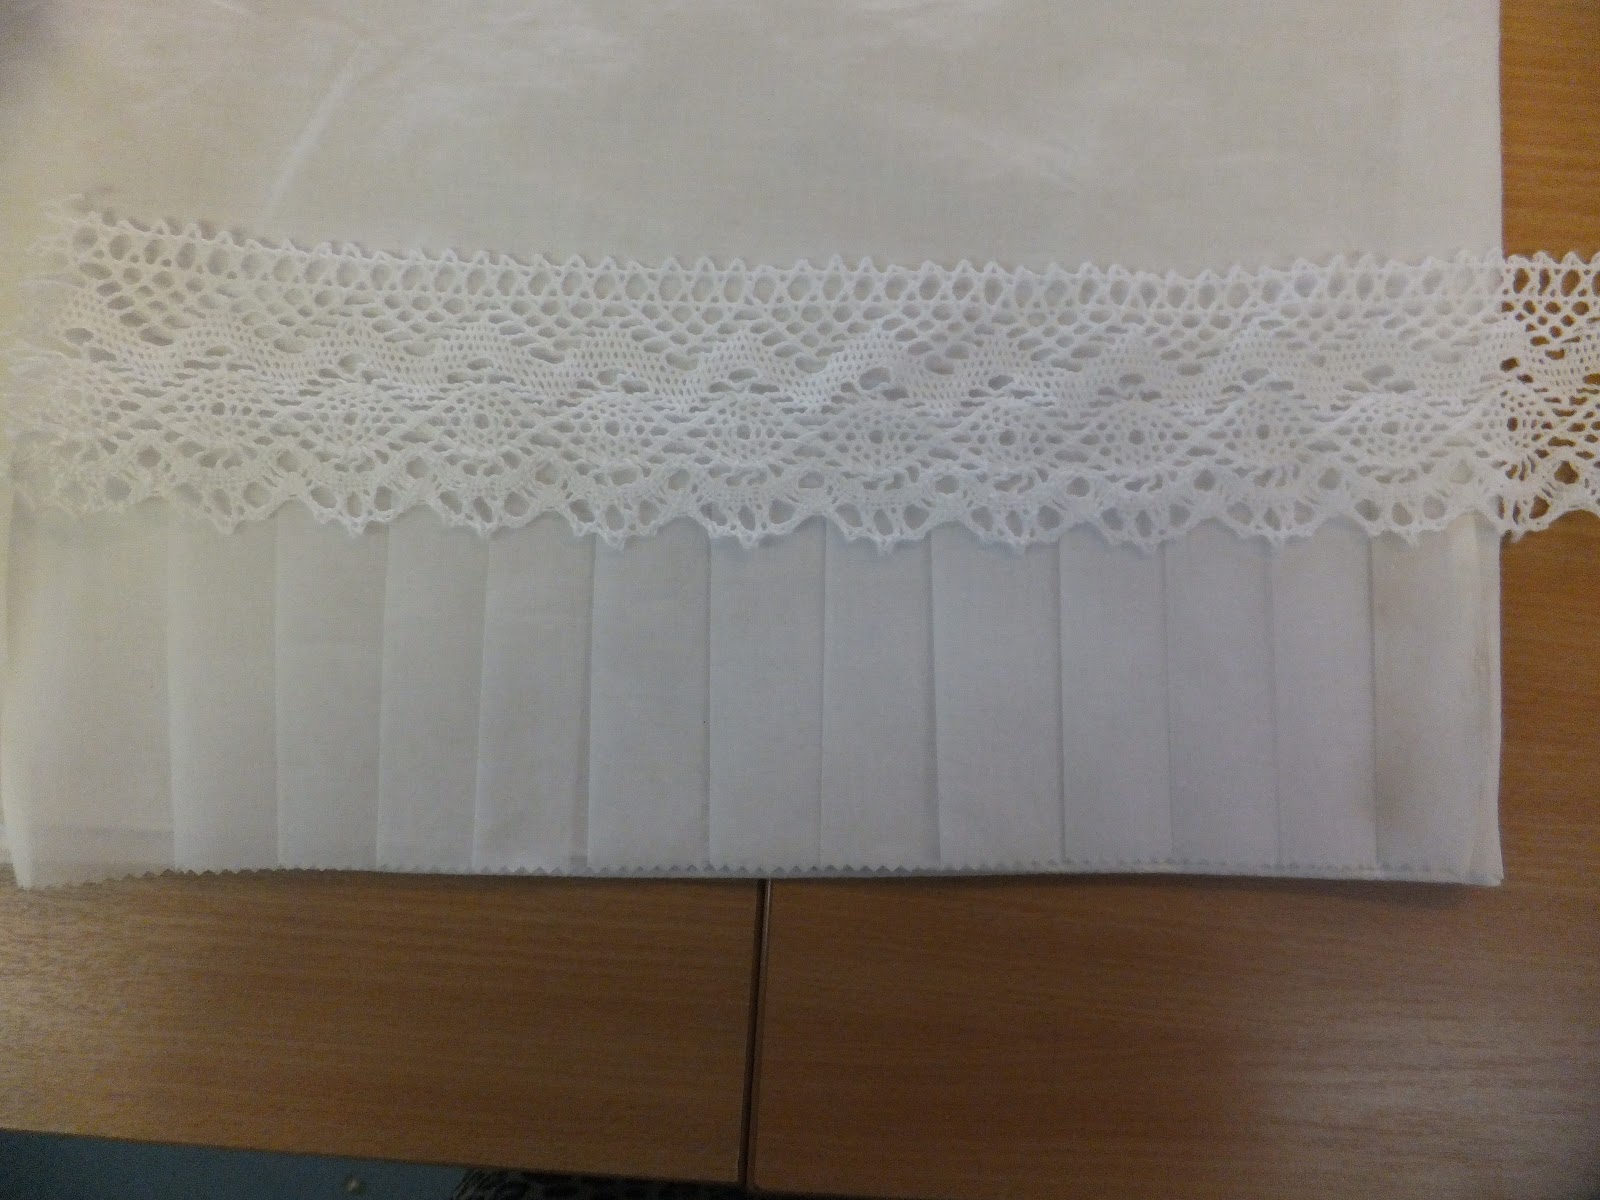
So what I have been making the last two weeks is a Dimity bustle, a petticoat and a train.
The bustle or tornure gives the shape to the rear for the swags of the dress to drape on nicely. This one is long and not too large made of cotton and crinoline steel. it has added ruffles and flounces at the bottom to help puff out the shape.
The petticoat has the straight front of the period, a large flounce and a gathered channel to draw all the excess material to the CB. I used period techniques such as fork pleats at the bottom and a lace insertion to give it an authentic feel.
The train itself is not yet finished; it is cream whereas the rest of the undergarments are white. this is because the dress has cream lace and organdy frill at the hem and the train is the only undergarments that touches the floor, which mean it may be seen, so has to match. It will be finished with cream silk edged ruffles from top to bottom, with the last few ruffles in the same satin as the dress. The train gives the last 'pouff' to support the swags of the dress and will also act as a dust mat, with the train of the dress resting on this train instead of the floor. It will be finished off with wide heavy cream lace to give it a grand look.


Period Techniques:
With having to pleat such a long length of organdie, I used a technique known as fork pleating as demonstrated in the following Truly Victorian video.
http://trulyvictorian.com/videos/ForkPleats.MOV
It made the process very simple as the turn of the fork measured out the width of the pleat each time, and did the turning for me.

For the Lace insetion I referred to a book from my own library Called Authentic Victorian Dressmaking Techniques which details the process.http://books.google.co.uk/books?id=z8ajx5DkSJQC&pg=PA114&lpg=PA114&dq=victorian+lace+insertion+method&source=bl&ots=_upu4TCS5E&sig=yQjAvHw3FLY0tfkv3azvlEJi7AA&hl=en&sa=X&ei=Ldy9UL_MBZSp0AXz64BI&ved=0CD8Q6AEwAw#v=onepage&q=victorian%20lace%20insertion%20method&f=false
Outcome
I have really enjoyed making the undergarments for the project. For a costumier, this is a fundamental skill and basic building block of any costume. You need to make sure you have done your research for your period and therefore are creating the right shape. Prior to this project I have made several corset and stays from different periods and a set of pocket hoops and bum pad, so it was nice to make the bustle and petticoat. the patterns were easy to follow and I felt confident during construction.
I chose robust fabrics and materials, just as I would for a stage costume, so that these foundations can be used again in further projects.
Moving on, I hope to hold a decent collection of undergarments spanning different periods so that I can have them on hand when I am creating further costumes- next on my list to tackle(when I have the time) with be a full cage crinoline of the 1860's.
At this point the train has not yet been completed, mainly as I need to move on to the toile to keep up with my planned schedule, but also because I hope to use some of the left over fabric of the dress at the bottom frills, so that if it is seen for any reason (as you might expect from sitting down for example) that it merges in with the top garment, so to minimise the chance of it looking out of place.
I still need to decide if all the undergarments work towards creating the right shape for the dress, this is something I may know at the toile stage, or it is something that I may not be sure about until the final finished dress is on a model with all the undergarments as well.
No comments:
Post a Comment